A classic Rebel vs Imperial match up, with both of their corvette class ships ready to blast each other to pieces. What could possibly go wrong? Max and I went to York Garrison Wargames for a 300 point match. After the stomping I got from Max last time, we agreed that we would not field more than 2 of the same ship or upgrade.
My list
CR90 Corvette (Fore) – 80 points
Tantive IV, Weapons Engineer, Single Turbolasers, Quad Laser Cannons, Sensor Team, Supercharged Power Cells, Breach Specialist, IG-RM Thug Droids
CR90 Corvette (Aft) – 59 points
Raymus Antiles, Single Turbo Lasers, Optimised Generators
CR-90 total = 139 points
Esege Tuketu + Twin Laser Turret + Recon Specialist (37 points)
Shara Bey + Alliance Overhaul + Weapons Engineer (31 points)
Rorak Garnet (19 points)
Jess Pava (25 points)
Blue Squadron Pilot + Fire-Control System (24 points) x2
Max ran two Tie Aggressors, two Glaive Squadron Tie Defenders with TIE/D, Ion Cannon and Crack Shot, Captain Jonas with Deadeye, Proton Torpedoes and Extra Munitions, Howlrunner with Decoy, and an Imperial Raider which included a Single Turbolaser on the fore, and a Single Turbolaser and Quad Laser Cannons on the aft (plus some other upgrades including 2x IG-RM Thug Droids.)
Setup
At 299 points to Max’s 300, I had the initiative bid, which was perfect as the CR-90 and Raider are both pilot skill 4. By giving initiative away, I was able to make Max place his Raider first, which meant I could set up the CR-90 to broadside it and get maximum firepower at it. He then placed his Tie Agressors to the right of his Raider to protect it from flanking. I placed my fighter screen opposite to answer this, and Roark Garnet and Esege Tuketu to support my CR-90. He placed his Tie Defenders to confront the CR-90, and Captain Jonas and Howlrunner to support the Raider.
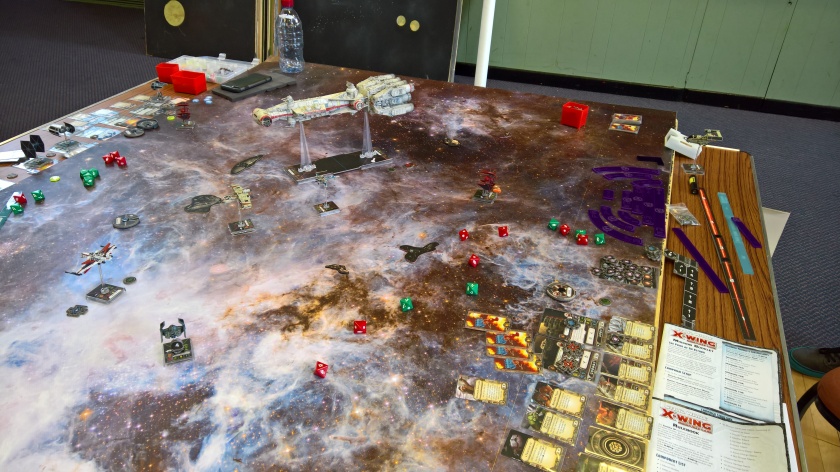
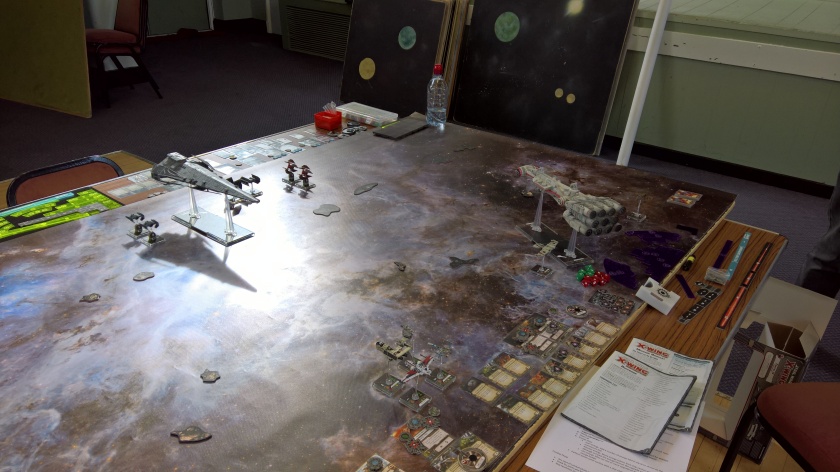 Setup complete (the Mist Hunter in the bottom left is a proxy for a forgotten B-Wing model.) I am split in to a fighter formation (bottom left) and the CR-90 with support ready to broadside (top right.)
The game
The first round was fairly uneventful. All ships crawled forward (most had been setup within range 1 of the board edge rather than up to the permitted range 2.) The CR-90 got a couple of shots at a Tie Defender which bounced off it’s green dice, and the Raider shot at a B-Wing with it’s Single Turbolaser. With Captain Jonas nearby it was able to re-roll two dice, and I reminded Max the Single Turbolaser can turn one focus result to a hit. This was very much the tone of the game, it was quite casual and we both reminded each other about missed opportunities. The B-Wing lost 4 shields, and I knew the TLT’s on the Tie Aggressors would be in range next turn, I didn’t think my low agility fighters would last much longer at this point!
The second round was more eventful. The CR-90 was in range of the raider, so I grabbed target locks on the Raider and Captain Jonas with Sensor Team and Weapons Engineer. I used Roark to make the CR-90 pilot skill 12, then proceeded to blast away! I spent an extra energy and my Supercharged Power Cells to perform a 7 dice primary attack on the Raider. Even with my target lock and focus bank from Esege, I only managed to take off 5 shields (Max had used reinforce on the fore.) The fore Single Turbolaser only did one damage, so I had removed all the shields off the fore of the Raider. The aft Single Turbolaser could only reach Captain Jonus, who successfully evaded the attack. Max used decoy on Howlrunner to make the Raider pilot skill 8, so the Raider went next. He shot at the CR-90 fore with his front Single Turbolaser and removed two shields, and used his primary weapon on the B-Wing as the CR-90 was out of range. He spent two energy to double tap, and destroyed the B-Wing. First blood to Max!
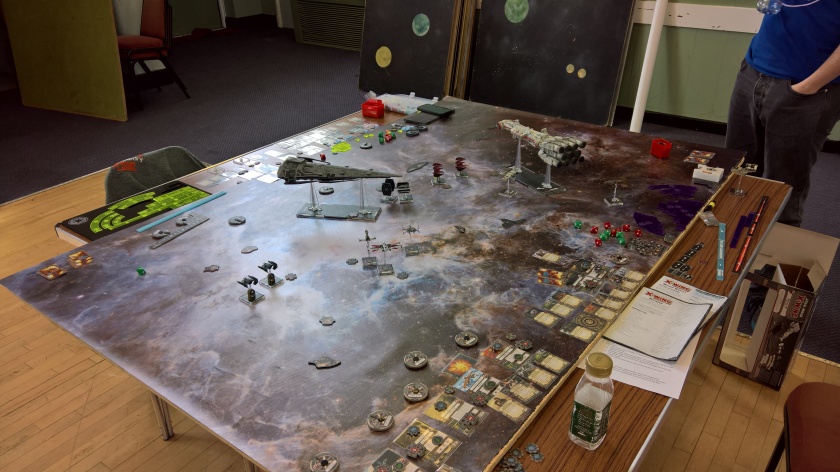
 End of combat phase round 2
Round 3. The hardest decision was during the activation phase. Do I recover the three shields, or do I reinforce the fore? I opted for reinforce, given that there were more than likely three attacks coming my way. Combat began with more harassment for the Raider. Max had recovered all the shields on the fore, so I had to start again. Again, Roark made the Raider pilot skill 12, and I was able to launch my primary weapon and both Single Turbolasers on the Raider. Without a reinforce token, the CR-90 was able to take down the shields again, and get some damage through, including a crit that meant Max now had to spend an energy to perform an action. Annoying, but not crippling with the Optimised Generators upgrade. The Raider (again pilot skill 8 with decoy), had to split it’s fire due to range and arc restrictions, stripping shields off the CR-90’s fore and taking some shields off Jess Pava and the B-Wing. The Single Turbolasers were having more luck as Captain Jonus allows them to re-roll two dice, as opposed to Howlrunner’s one on the primary weapon. The Raider shooting at pilot skill 8 also played to my advantage, as the crits from the IG-RM Thug Droids were absorbed by the shields of my ships. Captain Jonus launched his Proton Torpedoes at Esege and took out his shields. A Tie Defender fired both it’s Ion Cannon and primary weapon at the CR-90, and got damage cards through. The second fired the Ion Cannon at the CR-90 and the primary weapon at Esege, who only took one damage due to some unlucky dice rolling from Max. My fighter screen then opened up the on the fore of the Raider, leaving it with one just hull remaining! I also gave him a nice crit reducing his primary weapon value by two. The Tie Aggressors started to harass the B-Wing with their Twin Laser Turrets. At this point I was starting to worry about how I was going to get the CR-90 turned round, given epic ships can only make 45 degree turns. And doing it avoiding the obstacles would be even harder.
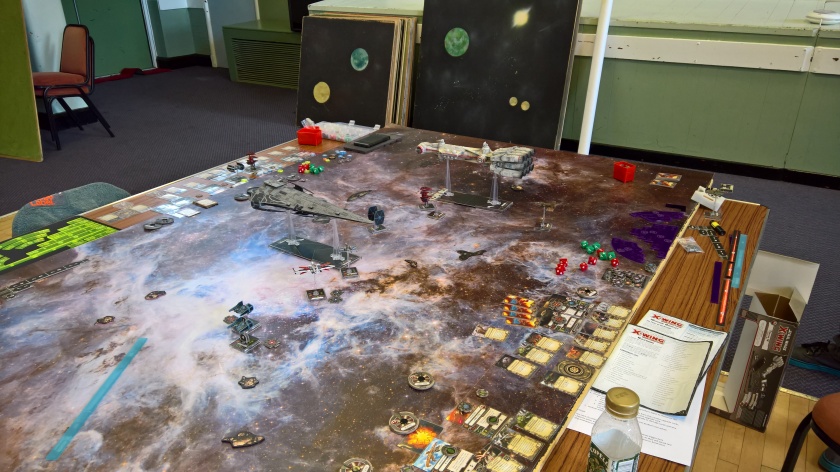
 End of combat phase round 3
Round 4 was probably the most brutal. Again, I chose to reinforce rather than recover with the CR-90. I used Raymus Antilles to successfully stress a Tie Defender, which (unable to barrel roll) got run over by my CR-90. Max took a swerve to the right with the Raider to try and run over Jess Pava, but missed her by millimetres! Roark made the CR-90 pilot skill 12 again, and it was able to finally cripple the front of the Raider with a Single Turbolaser. The crippled side of the Raider only has a primary weapon value of 2, so together with the crit it already had, the primary weapon was wiped out! I used the other Single Turbolaser and the Primary Weapon to remove the shields on the aft with some very good rolls, and landed a crit that snuck past the shields which disabled his Quad Laser Cannons on the aft, leaving Max with only a Single Turbolaser on the fore to shoot with! My Quad Laser Cannons unloaded on Howlrunner and left her with one hull remaining. The Defender split it’s fire, shooting Roark with the Ion Cannon and ionising it, and unloading a range 1 shot in to the CR-90. Esege’s range 1 primary weapon attack bounced off the Tie Defender, but weirdly the 1 attack dice shot from Roark at range 3 hit and took a shield off it! Shara Bey unloaded in to the aft of the Raider, and the Tie Aggressors took out my second B-Wing. However, I had turned the tide at this point; with the Raider nearly down, two ships destroyed and a 3rd on one hull left.
 End of combat phase round 4
Round 5, and Max was out to retaliate against Roark! But at the start of the activation phase, I was able to stress the Tie Defender with Raymus Antilles so he would have to do it without dice modification. However, this round was mainly mop-up for the rebellion. The CR-90 destroyed the Raider, and managed to chip another shield off the Tie Defender with two attempts using the Quad Laser Cannons. Max nearly got his wish as he almost destroyed Roark with both attacks from the Tie Defender, and Jess Pava destroyed Howlrunner. His Tie Aggressors stripped the shields off Shara Bey.
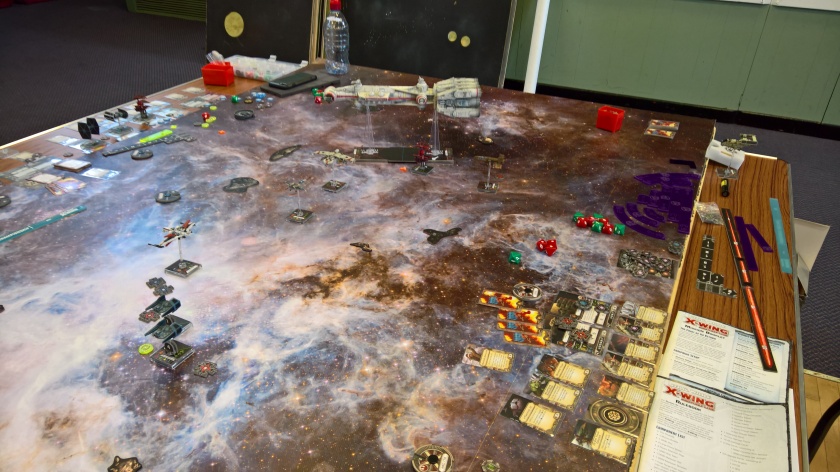 End of combat phase round 5. The CR-90 is down to 4 hull remaining on the fore but still going strong.
Round 6 was a fairly fast round, where the Tie Defender finished off Roark, and I threw Shara Bey’s rear arc, Esege’s Twin Laser Turret and two long range shots from the CR-90 at the Tie Aggressors. I managed to destroy one and deal two damage to the other.
We called it there as Max had places to be, and to be fair it wouldn’t be much of a game (I’d probably destroy the Tie Aggressor next turn, but in exchange the Tie Defender would probably cripple the front of the CR-90, and I’d have to hunt it down with the smaller ships which were quite scattered. All in all, an enjoyable game.
 End of combat phase round 6
Man of the match
Man of the match has to go to the CR-90 due to the sheer amount of damage it put out!
Summary
We both had a fun game, it felt quite balanced until the tipping point in round 4. The Tantive/ Roark/ Esege synergy is fantastic. The Imperials had the Captain Jonus/ Howlrunner buffs, but it’s nowhere near as effective. Max felt his Raider build needed some work. Operations Specialist on the Raider didn’t trigger once, Weapons Engineer would have worked better (it’s more useful than most of the team upgrades.) I could do more with my focus and blank results than Max. His IG-RM Thug Droids need him to roll hits first to be useful.
With these two ships, placement is key. Getting my broadside meant I was able to do all 4 attacks consistently. The Raider is trickier to get multiple attacks lined up. Due the the placement of all it’s arcs the sweet spot is harder to line up. Against a Gozanti carrying Deadeye Tie Bombers, I would have been in trouble, as the CR-90 carries most of my points and firepower, and munitions would chew through it.
The Tie Defenders with TIE/D and Ion cannon scared me when I saw them, as they are not only able to reduce the amount of energy I gain each turn, but they can also deal a three dice attack and are hard to hit with the CR-90’s weapons. Luckily, I ran over one quite early, and the Optimised Generators helped keep the tanks full.
We both also found an interesting dynamic when taking actions with the huge ships – when you are likely to be shot multiple times and have already taken damage, do you recover shields or reinforce? As you have seen with my GR-75 builds, I like to recover shields to absorb any potentials crits, but this game I reinforced each time instead. Looking at what was coming in round 3, I could have recovered three shields, but it looked like there were four attacks coming in so reinforce seemed like a better option, as it would prevent four damage. It was also more re-assuring doing this with the breach specialist onboard incase I got any nasty faceup damage cards, then I could just flip them facedown. I love the artwork on this card, though it didn’t end up getting used in the end.
Till next time, fly casual!
